

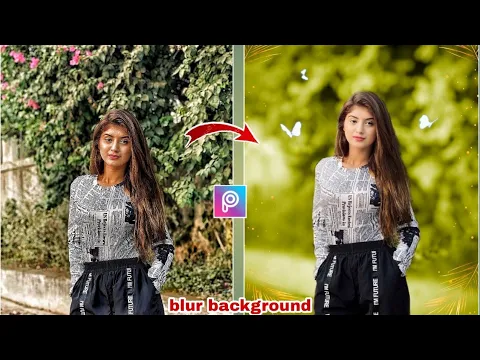
For photo editing and creating eye-catching effects such as blur background, PicsArt has become the favored app for both hobbyists and professionals. With its multitude of features and user-friendly interface, it allows you to transform your photos into stunning works of art. In photography, blurring the background of a picture is one of the most prevalent editing methods, enhancing depth and focus in your images.
Allow us to provide a step-by-step guide to blur a picture’s background in PicsArt.
Why Blur Background?
Before we delve into the intricacies of blurring the background in PicsArt, let’s understand why this technique is so popular among photographers and photo enthusiasts. The tutorial on using the PicsArt blur tool to blur the picture background serves several purposes:

Professional Look: Blurring the background of a picture instantly adds a professional touch to your photo, making it appear more polished and visually appealing as the PicsArt blur effect does.
Subject Focus: By blurring the background, you can draw attention to the main subject of your photo, making it the focal point of the composition.
Distraction Removal: If you have a busy or cluttered background in a picture that distracts from the main subject, blurring it with a tool like PicsArt can help eliminate the distractions and create a cleaner, more photography-focused image.
Artistic Flair: Blurring the background can add a sense of depth, dimension, and artistic flair to an otherwise ordinary image, transforming it into a visually captivating piece of art.
Now that we understand the benefits of blurring the background, let’s explore how to achieve this effect using PicsArt.
Blurring the Background in PicsArt: Step by Step
Step 1: Open the Image in PicsArt
To begin blurring the background of your photo, open the PicsArt app on your device. Tap on the “+” icon to add a new photo to edit. Select the desired image from your gallery or take a new photo using the app’s camera feature.
Step 2: Access the Editing Tools
Once you have the image open in PicsArt, you will see a toolbar at the bottom of the screen. Tap on the “Tools” tab to access a wide range of editing options.
Step 3: Select the Blur Tool
In the tools menu, locate and tap on the “Blur” tool. This tool is represented by an icon that resembles a raindrop.
Step 4: Adjust the Blur Intensity
After selecting the blur tool, you can adjust the intensity of the blur effect. Use the slider at the top of the screen to increase or decrease the blur strength according to your preference. This allows you to control the amount of background blur in your photo.
Step 5: Apply the Blur Effect
Once you have adjusted the blur intensity, it’s time to apply the effect to the background of your photo. Using your finger or a stylus, gently brush or tap over the areas of the image that you want to blur. Be mindful of the edges and boundaries to maintain a natural-looking transition between the subject and the background.
Step 6: Refine the Blurred Areas
If you accidentally blurred areas that you didn’t intend to, don’t worry. PicsArt provides an eraser tool that allows you to refine the blurred areas. Simply select the eraser tool and carefully erase the unwanted blur, restoring the original details.
Step 7: Save and Share
Once you are satisfied with the result, save your edited photo by tapping on the save button. PicsArt offers various saving options for your blurred photo, including saving to your device’s gallery, sharing directly to social media platforms, or exporting to other editing apps for further enhancements.
Other Blurring Techniques in PicsArt
In addition to the Blur tool, PicsArt, an online photo editor, offers several other methods to achieve the desired blurring effect while editing a photo. Here are a few alternative techniques you can explore:
Process Effect
The Process effect in PicsArt allows you to blur a photo or its specific areas using a variety of filters, including motion blur. Access the Process effect by tapping on the “Effects” tab in the toolbar. Scroll through the available filters in PicsArt and select the one that suits your desired blurring style or the strength of the blur.
Tilt-Shift Effect
The Tilt-Shift effect simulates the shallow depth of field achieved with a tilt-shift lens, creating a selective focus look. To access this effect, tap on the “Effects” tab and search for “Tilt-Shift.” Adjust the size, shape, and intensity of the blur to create a customized blurred background.
Background Eraser Tool
If you want to completely remove the background and replace it with a different image or a solid color, PicsArt’s Background Eraser tool is your go-to option. This tool allows you to precisely erase the background while retaining the foreground subject. Tap on the “Tools” tab and select the “Background Eraser” tool to get started.
Tips for Blurring Backgrounds in PicsArt
To achieve the best results when blurring the background in PicsArt, consider the following tips:
Experiment with Different Blur Intensities: Play around with the blur intensity slider in PicsArt to find the perfect balance for the strength of the blur in your photo. Adjust the strength of the blur effect according to your image and your desired outcome, more or less.
Practice Precision: Take your time when applying the blur effect, especially around the edges of the subject. A patient and detailed approach leads to a final image that looks realistic and professional when you blur a picture using PicsArt.
Combine Blur Techniques: Don’t limit yourself to just one blurring technique. Feel free to mix and match different methods to achieve the desired effect. For example, you can use the Blur tool for the background and the Tilt-Shift effect for selective focus on specific areas.
Use Undo and Redo: PicsArt offers an undo and redo feature, allowing you to revert changes or redo them if needed. Take advantage of these features to fine-tune your blur effect and achieve the desired outcome.
Mastering the Art of Blurring Backgrounds in PicsArt
With these guidelines and techniques, you are now equipped to blur the background of your photos using PicsArt. Remember to experiment, practice, and let your creativity shine through. Capture stunning images and elevate them to new heights with the power of background blurring. Happy editing!


One Comment
Comments are closed.