Fonts play an important role in enhancing the visual appeal and creativity of your designs and artwork. While PicsArt offers a limited collection of fonts, many users prefer to add custom fonts to personalize their projects further.
Now, we will see the process of adding custom fonts in PicsArt on both Android and iPhone devices.
Why Add Custom Fonts in PicsArt?
By adding custom fonts in PicsArt, you can unlock endless possibilities and elevate your designs to the next level. Custom fonts allow you to:
Stand out from the crowd: With a vast array of unique fonts at your disposal, you can create designs that are distinct and eye-catching.
Reflect your brand identity: Custom fonts enable you to align your designs with your brand’s personality and values, ensuring consistency across all visual elements.
Enhance creative expression: Different fonts evoke different emotions and convey specific messages. By using custom fonts, you can fully express your creativity and communicate your intended message effectively.
Now, let’s dive into the detailed steps for adding custom fonts in PicsArt on Android and iPhone devices.
The first step is to find and download the custom font of your choice. You can explore various sources such as Google Fonts, Dafont, or other free font provider websites. Once you have found the perfect font, follow these steps:
Visit the font source website, such as Google Fonts, and locate the font you want to download.
Download the font file, ensuring it is in either .otf or .ttf format.
If the font file is in a zip format, unzip it using any file extraction app.
Step 2: Add the Custom Font to PicsArt
Now that you have downloaded the custom font, it’s time to add it to PicsArt. Here’s how:
Open your device’s file manager and locate the downloaded font file.
Long-press on the font file to select it, then choose the “Copy” or “Move” option.
Navigate to the Internal Storage > PicsArt > Fonts folder. If the Fonts folder doesn’t exist, create one.
Paste the font file into the Fonts folder.
Step 3: Access and Use the Custom Font in PicsArt
With the custom font added to PicsArt, you can now access and use it in your designs. Follow these steps:
Open PicsArt on your Android device.
Select or create a project where you want to add text.
Tap on the “Text” option to add a text box to your design.
Enter the desired text in the text box.
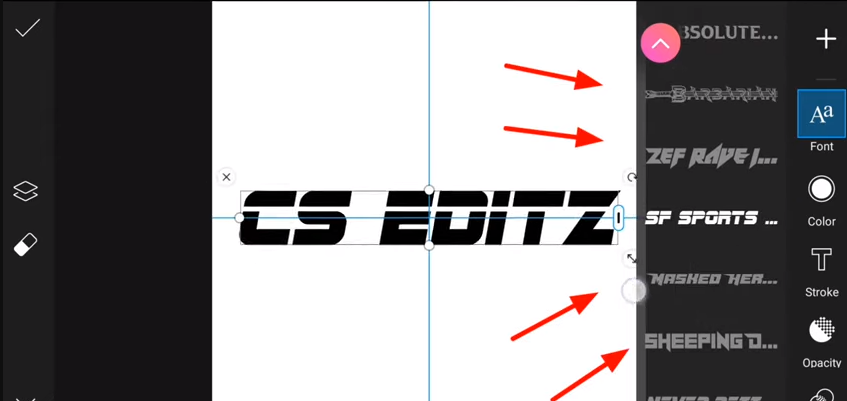
Tap on the “Font” option to access the font library.
Scroll down and locate the “My Fonts” section. Tap on it to open your custom font library.
Select the custom font you added earlier from the library.
Customize the text further by adjusting the size, color, and other formatting options available in PicsArt.
Once you are satisfied with the design, save or export your project.
Congratulations! You have successfully added a custom font to PicsArt on your Android device.
Similar to the Android process, you need to find and download the custom font for your iPhone. Here’s how:
Visit a font source website such as Google Fonts or Dafont.
Locate and download the custom font file in .otf or .ttf format.
If the font file is in a zip format, unzip it using a file extraction app.
Step 2: Add the Custom Font to PicsArt
Adding custom fonts to PicsArt on an iPhone requires a slightly different process. Follow these steps:
Open the Files app on your iPhone.
Locate the downloaded font file.
Long-press on the font file and select the “Share” option.
From the share menu, tap on the PicsArt icon to launch the application.
Step 3: Access and Use the Custom Font in PicsArt
Once you have added the custom font to PicsArt on your iPhone, you can start using it in your designs. Here’s how:
Open PicsArt on your iPhone.
Choose or create a project where you want to add text.
Tap on the “+” icon to add a new layer.
Select the “Text” option to add a text box to your design.
Enter the desired text in the text box.
Tap on the “Font” option to access the font library.
Scroll through the fonts until you reach the “My Fonts” section.
Tap on “My Fonts” to open your custom font library.
Select the custom font you added earlier.
Customize the text further by adjusting the size, color, and other formatting options available in PicsArt.
Once you are satisfied with the design, save or export your project.
Congratulations! You have successfully added a custom font to PicsArt on your iPhone.
Tips and Troubleshooting
Make sure to comply with the terms of use for each custom font you download, as some fonts may have restrictions on commercial use.
If you encounter any issues with adding or accessing custom fonts in PicsArt, try restarting the app and your device.
Keep your custom font library organized by periodically removing unused or duplicate fonts from the PicsArt Fonts folder.
Add Custom Fonts Now!
Adding custom fonts in PicsArt allows you to elevate your designs and express your creativity to the fullest. Whether you are using an Android device or an iPhone, the process is simple. Follow the step-by-step instructions outlined in this guide, and you’ll be able to add and use custom fonts in PicsArt with ease.
Unlock the full potential of your designs and make them stand out with custom fonts in PicsArt. Happy designing!
Frequently Asked Questions (FAQS)
Download your preferred font in .otf or .ttf format, copy it to the PicsArt > Fonts folder in your device’s file manager, and access it in PicsArt under “My Fonts” when adding text to your design.
Download the font, share it to PicsArt using the Files app, then find it in the “My Fonts” section when adding text to your design.
Explore font sources like Google Fonts or Dafont, download in .otf or .ttf, and follow the steps to add them to PicsArt.
Fonts should be in .otf or .ttf format for compatibility with PicsArt.
After selecting your custom font, adjust size, color, and formatting options available in the PicsArt app.
Restart the app and your device if you encounter any problems during font addition.
Check and adhere to the terms of use for each font, as some may have limitations on commercial use.
Periodically remove unused or duplicate fonts from the PicsArt Fonts folder to maintain an organized library.
For photo editing and creating eye-catching effects such as blur background, PicsArt has become the favored app for both hobbyists and professionals. With its multitude of features and user-friendly interface, it allows you to transform your photos into stunning works of art. In photography, blurring the background of a picture is one of the most…
Are you ready to take your photo editing skills to the next level? Look no further than PicsArt 101! Whether you’re a beginner or looking to brush up on your editing basics, PicsArt 101 has got you covered. In this comprehensive crash course on the PicsArt blog, we’ll walk you through all the essential tips and…
Picsart is a popular photo and video editing tool that offers a wide range of features, including the ability to record and take screenshots of your edits. Whether you want to capture your editing process for tutorial purposes or simply save a particular moment, taking a screenshot in Picsart is a straightforward process. so, we…
Are you passionate about photo editing, video editing, creating collages, graphics, and sketching? If so, you’re in the right place! In this article, we will explore the amazing world of PicsArt, one of the most popular photo and video editing apps for beginners and advanced users alike. We’ll delve into what PicsArt has to offer,…
In today’s digital age, photo editing has become an essential skill. Whether you’re an aspiring photographer or just someone who loves capturing memories, being able to edit your photos can take your images to the next level. One popular photo editing app that has gained immense popularity is PicsArt. With its user-friendly interface and powerful…
In today’s digital age, sharing multiple photos in one cohesive layout has become a popular trend. Whether you’re posting images from a special trip or commemorating important occasions, a collage is a great way to showcase your memories in a visually appealing and personalized manner. With the PicsArt Collage Maker and its collage templates, you can…


2 Comments
Comments are closed.